How to Make Freeze Dried Sweets at Home?
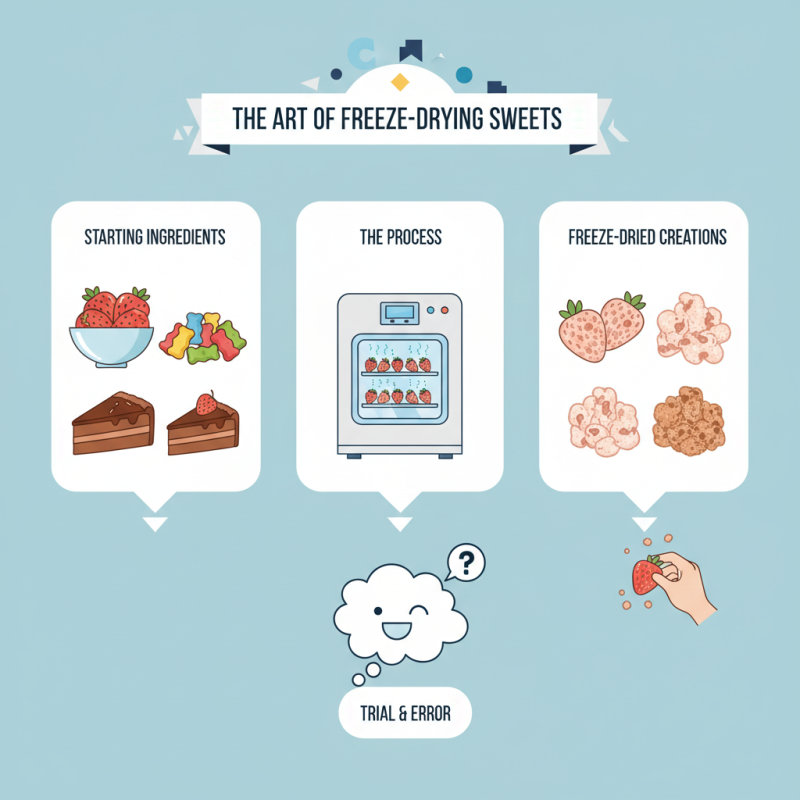
Freeze Dried Sweets are a unique treat. They preserve the flavor and nutrition of fresh ingredients. Making them at home can be a fun experiment.
The process involves removing water from food. This typically retains the original taste while creating a crispy texture. You can start with fruits, candies, or even desserts. Imagine biting into a strawberry that bursts with flavor yet is crunchy.
However, it takes practice to get it right. You may face challenges with moisture levels and drying times. Each attempt might not yield perfect results. Reflection is key. Evaluate what works and what doesn't. Your journey into making Freeze Dried Sweets can be filled with surprises and learning opportunities.
Understanding Freeze-Drying: The Science Behind the Process
Freeze-drying is a fascinating process. It removes moisture from food products rapidly. According to industry reports, the global freeze-drying market is projected to reach $3.6 billion by 2025. This growth highlights a rising interest in freeze-dried foods. Many consumers are now looking for preservation methods that maintain flavor and nutritional value.
The process involves three stages: freezing, primary drying, and secondary drying. During freezing, water within the food crystallizes. This step is crucial. It allows the moisture to be removed without damaging the food's structure. Primary drying then creates a vacuum. This phase pulls away ice by sublimation, transforming ice directly to vapor. Finally, in secondary drying, any remaining moisture is eliminated. This step is imperative for shelf stability, ensuring products can last for extended periods.
However, techniques for freeze-drying at home may lead to challenges. Not everyone has access to commercial freeze-dryers. Many DIY methods yield inconsistent results. Controlling temperature and pressure can be tricky. Improper execution could lead to food spoilage. Understanding these factors is key for successful freeze-dried sweets. Demystifying the science behind freeze-drying can ultimately elevate your home kitchen experience.
Freeze-Dried Sweets Popularity Over the Years
Essential Equipment for Home Freeze-Drying
Home freeze-drying can be an exciting culinary adventure. To get started, essential equipment is necessary for successful results. The key piece is a freeze dryer. These machines remove moisture from food while preserving flavor and nutrients. According to industry reports, freeze-dried foods retain up to 97% of their nutrients compared to other preservation methods.
In addition to a freeze dryer, consider airtight storage containers. These keep your treats fresh. Oxygen absorbers are vital too, as they extend shelf life by limiting oxidation. A vacuum sealer can also help pack sweets neatly. Many first-time users overlook the importance of storage. Proper storage affects quality over time.
Temperature control is crucial during the freeze-drying process. If it’s too high, you may end up with a crumbly texture. Too low, and moisture might remain, leading to spoilage. Balancing these factors may feel tricky initially, but practice makes perfect. Mistakes will occur, and that’s part of learning.
Step-by-Step Guide to Preparing Ingredients for Freeze-Drying
Freeze drying is a fun and innovative way to preserve sweets at home. Preparing your ingredients is the first vital step. Start with fresh fruit, like strawberries, bananas, or apples. These fruits should be ripe, as they contain the highest concentration of flavors. Be sure to wash and slice them evenly, ideally about 1/4 inch thick. Uniform slices will ensure consistent drying results, as uneven pieces might retain moisture.
According to the USDA, the freeze-drying process can retain 97% of food's nutrients. This makes it an excellent choice for preserving both flavors and health benefits. After slicing, arrange the fruits in a single layer on the freeze dryer trays. Avoid overcrowding, as this can lead to poor airflow and uneven drying. Peer-reviewed studies suggest that low temperatures during the freeze drying process help maintain quality. However, if your ambient humidity is high, it might hinder the freeze-drying efficiency. Check the weather before starting; sometimes, even the environment plays a role.
Plan your sugar content wisely. Higher sugar levels can affect the freeze-drying process. Confections like gummies or chocolate can be tricky. They may not dry well unless adjusted properly. Testing a small batch can help determine the right formula before fully committing. Reflect on your initial results as well. Not every attempt will yield perfect sweets. Embrace the learning curve. It’s part of the process!
How to Make Freeze Dried Sweets at Home? - Step-by-Step Guide to Preparing Ingredients for Freeze-Drying
| Ingredient | Preparation Method | Freeze-Drying Time (hours) | Yield (cups) |
| Strawberries | Wash, hull, and slice | 12-24 | 2 |
| Bananas | Peel and slice | 15-20 | 1.5 |
| Mangoes | Peel and cube | 18-24 | 2.5 |
| Pineapples | Peel, core, and slice | 12-18 | 3 |
| Apples | Wash, core, and slice | 12-16 | 2 |
Techniques for Making Various Types of Freeze-Dried Sweets
Freeze-drying sweets at home can be a fun process. It transforms fresh fruits and candies into crunchy, flavorful treats. A well-used method is to slice fruits like strawberries or bananas. Make them thin for better results. Lay the pieces on a tray, ensuring they do not touch. This step is crucial. If they overlap, moisture will be trapped, ruining the texture.
Another technique involves using marshmallows or gummy candies. Place them on a tray and freeze for several hours. This allows the freezing process to begin deep inside. Once they are solid, it’s time to start the freeze-drying. Keep an eye on them. The temperature and time matter in this step. If left too long, they may turn too hard.
Exploring other ingredients can yield unique sweets. Try yogurt drops or even chocolate-coated snacks. However, remember that not all items freeze-dry equally. Adjust expectations. The taste and texture may vary. It might take a few tries to get it right. Stay patient. Each attempt leads to a better understanding of the process.
Storage and Usage Tips for Homemade Freeze-Dried Treats
Freeze-drying homemade sweets can be a delightful process, but proper storage is essential. Airtight containers are crucial. They protect against moisture. According to a National Institute of Food Technology report, moisture can significantly affect freeze-dried foods. That's alarming, isn't it? A small mistake can ruin your hard work.
Labeling is important. Include the date and contents. This helps track freshness. Research shows that freeze-dried treats can last up to 25 years if stored correctly. However, exposure to air can shorten this lifespan. The American Food Preservation Association recommends using oxygen absorbers to extend duration and maintain quality.
Usage of these treats varies. Just rehydrate them with water or enjoy them as they are. Some may add them to recipes, while others enjoy them as snacks. Keep in mind that not all sweets retain flavor and texture after freeze-drying. Experimentation is part of the process. You may have to adjust recipes, making it trial and error. Embrace the journey of creating perfect freeze-dried sweets at home!